Well, we’re preparing for the big move! And I don’t mean our move to Boston, although we are leaving for that TOMORROW! (WOOHOO!) But actually, in the context of blogging, I’m talking about how to move from Blogger to WordPress. This series is now in week 8 and we’ve been making great progress working on Lori’s blog redesign (and hopefully you’ve been making progress on your blog too!) as we’ve been going through this series. The goal was to use Lori’s blog, In My Kitchen, In My Life as a demonstration on how to create a new fully branded look, to move from Blogger to WordPress, and use WordPress tools to best benefit your blog.
So far, we’ve mostly been working on the branding and design aspect. Next week, I’m excited to say, is when we will move her blog from Blogger to WordPress! But one of the things about switching to a new blogging platform is learning how to use it. Lori is, of course, completely new to WordPress, and I’ve heard several of you mention in the comments that you tried WordPress but just were not sure how to use it. So for today’s post, I have 25 WordPress how-to’s, ranging from more simple things such as how to schedule a post to publish later, to things that might be a little more advanced, like how to make printables available on your site, or how to make a custom default avatar for your blog. So hopefully by the end of the post you’ll feel much more at home in WordPress – or even if you’re already on WordPress, that some of the more advanced tips will still be helpful to you! 🙂
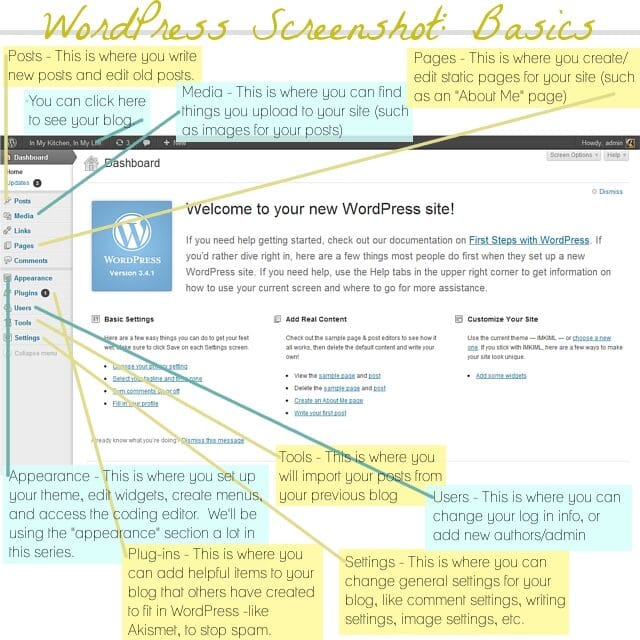
All the tips assume that you are using WordPress.org on your own domain (some may apply to WordPress.com as well, but I’m just not familiar with it), and that you are logged in to your WordPress dashboard. If you’re not sure how to get there, just go to www.YOURSITEADRESSGOESHERE.com/wp-admin and sign in there to get to your dashboard. This is your dashboard – and the menu over on the left side is how you navigate around to different tasks:

So let’s jump right in! We’ll start off with the simpler tips. The first eight tips all have to do with something that is obviously very important – creating new blog posts:

1. Visual vs. HTML.
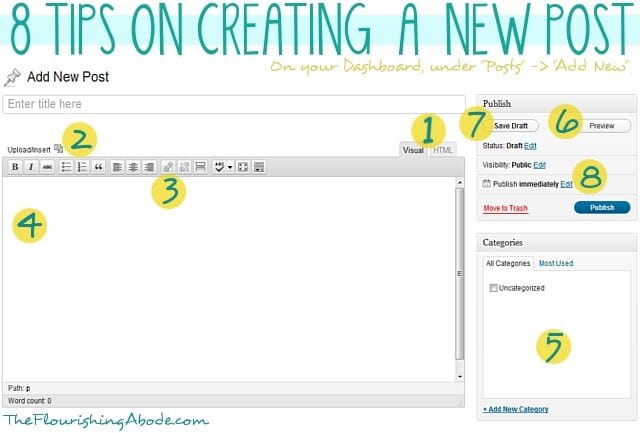
So the place to put the post title is pretty obvious, as is the large white area where you actually type the post. BUT — there are actually a couple different options on what format you want to use to write you blog post. One is visual and one is HTML. The tabs for these two options are shown at point “1”. Basically, if when you change the appearance of your post (like, if you add an image, make text bold, etc.) and you actually want to see the result of the change in the editing box, then use the “Visual” mode. If when you make a change to the appearance of the post, you don’t want to see the result, but instead you want to see and be able to write the actual HTML, then use the HTML mode. I personally always write in the HTML mode. Depending on which mode you choose, the options along the gray bar at the top of the edit box will look a little different. Heads up, though – while working on one post, don’t keep toggling back and forth between the two, as it can cause some hiccups. Just pick the one you want and stick with it.
2. Inserting images.
So, you’ve titled your post, and you’re writing it, but you want to add an image. This is super simple. Just click the little button by “Upload/Insert” (shown at point 2 in the image above). A box will pop up – click the “Select Files” button, then get the image you’re wanting to use from your computer. Once it has uploaded, scroll down the pop up box … there will be various options in the box you can choose if you want, such as resizing the image, making it centered, or “Link URL” (if you want the image to be a link to somewhere, then put the address as the link URL). Click the “Insert into post” button at the bottom, and now it is in your post!
3. Creating links.
Maybe you want to link to another website in your post. Use your mouse to select/highlight the text you want to turn into a link. Then click the “link” button (shown at point 3) and paste the address you want the text to lead to into the box that open. If you want, check the box that says “open this link in a new window”, so that when people click the link they won’t leave your blog but instead the link will open in a new window. Click “OK”. Now your text is a link like this: this text is a link.
4. Adding video from another website.
This may not be something you use all the time, but it’s handy to know. If you want to upload a video straight from your computer, you would just add it the same way you add an image. But if you want to include a video from another website in your post (for instance, a YouTube video), you might think you should try to use the “embed” code YouTube offers – but you’ll find it doesn’t work on WordPress. Actually, it’s simpler than that, anyway. For this, make sure you’re editing in the “HTML” mode, and just paste the link to the video right into the box. You don’t need any code, just the video address. Make sure the address is on its own line, without any spaces before or after the address, and you should be good to go!
5. Put posts in categories.
Categories are really helpful on a blog. For instance, this post I’m writing is part of a 10 part series, so I put each post for this series in the category “DIY Blog Redesign“. Then if you click on that category, it takes you to a page that has all the posts from that category. It’s pretty helpful for navigating around the site. So when you write a blog post, choose which categories it goes in. You get to make up your own categories, and add them with the link at the bottom of the category box. You can also edit your categories in greater detail by choosing the “Categories” option under “Posts” on your dashboard sidebar.
6. Preview before publishing.
Want to see how your post is looking? Just click the preview button. If you’re using “visual” mode, this may not seem as necessary, but I still encourage you to preview your post before publishing. Then you can check, for instance, that your post’s title fits on one line, that your images aren’t too large, etc.
7. Save drafts.
WordPress automatically saves a draft of the post you are working on writing, but even so, if you’re not ready to publish, be sure to hit “save draft” before closing the post.
8. Scheduling a post to publish in the future.
At point 8 in the image above, you’ll see where it says “Publish immediately”. That means if you hit the “publish” button, the post will go live right away. But what if you want it to wait and not publish until tomorrow? Or next week? Just click the “edit” button next to it, and select the date/time you want. Make sure you hit “ok” once you’ve made your choice. Now the publish button says “schedule” instead, and when you click it, that means the post will be published on your blog at the time you selected. Very helpful. For instance, if I was smart, considering that we are moving tomorrow, I should have written this post two weeks ago and scheduled it for today. Buuuuut I’m not that ahead of the curve, so instead I’m staying up late to write. 😉
And, as we mentioned last week, you edit stand-alone pages and posts in the same way, so those first 8 tips apply to both. The difference is just that to start you would choose either the “Posts” or “Pages” option on the navigation bar on your dashboard. You can click here to see last week’s post all about pages.
The next three have to do with handling your media:

1. Adding new media.
So, I mentioned before how to insert an image (or other media) directly into a blog post. Sometimes, though, you want to upload a file without just inserting it directly into your post. Just click the “add new” button in your media library, and then you can either browse for the file, or drag and drop into the box.
2. Making printables available on your site.
A good example of a time you might want to upload something on your site without directly inserting it into a post would be if you want to have a PDF printable file available on your site. So, first you would upload it, as stated above. Then, you need to get the URL of the file. To get to the URL of any media you have uploaded, hover your mouse over that item in your media library. A few options will pop up, as you can see by point #2 in the image above. Click “edit”, then scroll down to “File URL”. Copy the address you see there. Now, when you write your post, you can use that URL to create a link, either by using the link button (as described in tip 3 above) or by adding the link to an image (as described in tip 2 above). Now when your readers click that link, it will open the printable!
3. Always upload image at the width of your blog post.
There really isn’t much point to uploading giant sized images to your site. You still want it to display only as wide as your post, and it just makes your site run slower. Also, I highly recommend not using images less wide than your blog post, because then you start having all sorts of different width images in your posts and it just looks messy. I have a few old posts like this and they drive me crazy. It looks so much better to always have your images the same width – no wider and no more narrow than your post. I recommend that before you upload an image you make sure it is that width. For instance, I only upload images to my site that are 640px wide. It keeps it nice and easy, because you don’t have to resize in your blog, keeps your posts attractive, and doesn’t bog down your site.
The next 7 tips are about plugins…

1. Adding a new plugin.
Plugins are a great way to add new tools and functions to your blog. If there is something you wish your blog could do, chances are you can find a plugin that can make it happen. To add a new plugin, first click the “add new” button. (yeah, surprise!) Then, search for the name of the plugin you want. Once you’ve found it, click the “install now” link. Once it finishes install *make sure* you click the activate button. Easy! 🙂
2. Finding new plugins.
Ok, so step one sounds easy enough – but how do I know what the name of the plugin is that I’m looking for? You can always search keywords, but the plugin search is only so good, so personally I like to Google “wordpress plugin (and whatever use I’m looking for)” to find the names of plugins I might be interested in. I’ll share a few types you might find helpful in some of the other tips.
3. Changing the plugin settings.
Some plugins have settings that you might want to change. For instance, if you have a plugin that lets people follow you on Twitter, you will need to set it to know what your Twitter username is. Some plugins will add options/settings to your sidebar, but you can also find if there are settings in the menu of your installed plugins, as shown at point 3.
4. Anti-spam plugins.
As I mentioned, I’ll give a few categories of plugins you might be interested in – one of which is an anti-spam plugin. We’ve talked before about the evils of CAPTCHA, and you definitely want to avoid that, but some sort of anti-spam tool will most likely be needed. Preferably, though, you want one that will be invisible to your readers. Akismet is what I use, and I’m very pleased with it, although it does cost a few dollars a month.
5. Social media sharing buttons.
In one form or another, you certainly want social media sharing buttons so that your readers can easily share your posts with their friends and followers. The three biggest, at least for me personally, are Facebook, Twitter and Pinterest, although there are many more. A plugin that automatically includes sharing buttons at the end of your posts is a must have in my book.
6. Editorial Calendar.
Having an editorial calendar can be SO helpful in scheduling posts ahead of time. I already mentioned earlier how to schedule a post for the future … but looking at your list of posts/drafts/scheduled posts does not make it very easy to visually see what you have coming up on various dates. Installing an editorial calendar (which can then be accessed on your dashboard sidebar under “Posts” -> “Editorial Calendar”) makes it easy to have a visual sweep of upcoming posts, and lets you easily create drafts for future dates that you can then write later. Love. it.
7. SEO tools.
There is a lot to SEO (SEO = Search Engine Optimization) and how it works. Showing up well in search engines can be very important to a blog, or any website. A plugin that helps SEO won’t really be a fix all … but it can definitely help. I personally love Yoast. Once you install it, on the edit page of each post there will be a box at the bottom where you can input keywords, search engine titles and descriptions, and lots of other helpful SEO stuff. It isn’t all you need to have good SEO, but it does help. If you’re serious about SEO, there is a ton of great info out there on the web to help you.
The last 7 tips are on settings options:

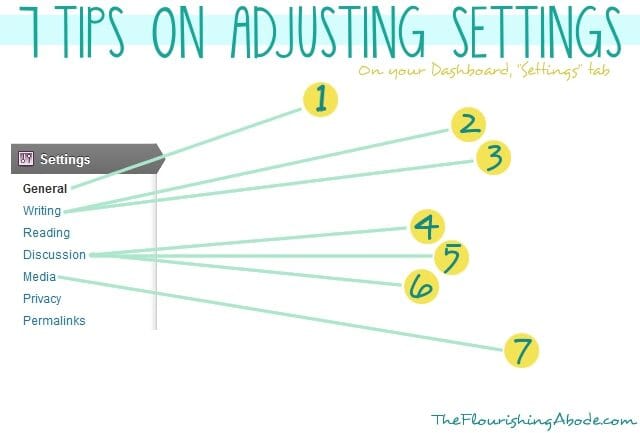
The menu shown above is what you would see in your navigation sidebar if you click on “Settings”. There are lots of settings you can explore under each option, but here are a few you might want to check on…
1. Time/date settings.
Under “general” options, you will find the time and date settings. Make sure these are set according to your time zone and such – it can be very frustrating to schedule a post and expect it to publish at a certain time, only to discover that your blog is on an entirely different time zone!
2. Unconvert emoticons.
I don’t know why, but the default setting in WordPress is that if you make a 🙂 face, it automatically turns it into a cartoon smiley face. Personally, I think it looks kind of … odd, especially if it is on a professional blog. You can turn off this option under the “writing” settings.
3. Default post category.
I mentioned categories earlier in this post. If on a particular post you forget to put it in any category, WordPress just goes ahead and puts in the default category, “uncategorized”. However, you can change what the default category is under the “writing” settings. My default category is “blogging”. 🙂
4. Disable pingbacks and trackbacks.
Under the “discussion” settings you will find lots of options for how people can interact with you blog. One of these options is “pingbacks and trackbacks”. I would strongly recommend disabling these. Unlike comments, which allow for discussion, pingbacks and trackbacks are just a breeding ground for spammers.
5. Comment settings.
There are lots of other comment options you can choose from in the “disussion” settings, as well. Comments are a HUGE part of blogging, so look through here and make sure the settings are set to the way you want – for instance, make sure threaded/nested comments are enabled, that people don’t have to be members of your site to comment, that you will be emailed when there are new comments, etc.
6. Custom default blog avatar.
This is a more advanced tip, but if you really want to take your branding to the next level, you can create a custom avatar just for your site that shows up if people don’t have a Gravatar. For instance, I have my illustrated typewriter than shows up as the avatar – although, of course, Gravatar trumps that, naturally. (If you don’t have a Gravatar, it is a universal avatar associated with your email, and anytime you comment, that avatar automatically shows up – I definitely recommend setting up your own at gravatar.com) But what I’m talking about for blog design is the avatar that shows up as default if people DON’T have a gravatar. There are a few rather blah options that WordPress offers, but you can really brand-up your blog with a personalized one. Using the instruction above about plugins, add the plugin “Add New Default Avatar”. Then, using the instructions from my previous post on making your own graphics, create a branded avatar .. 80×80 is a safe size in Thematic. Then using the instruction in today’s post about media, upload your image to your media library and get the URL. Then go to the “discussion” section of your settings, and scroll down to the avatars. Paste the URL in the custom avatar box, then save changes. Now, along with the other options for avatars, there should be your new custom avatar image. Choose that option, and click “save changes” again. Your blog now has its own custom branded default avatar! WooT!
7. Default image settings.
Under the “media” settings, make sure that the auto embed is enabled, so that you can just paste YouTube addresses in (as mentioned before) … and it can also be a good idea to adjust the auto sizes of your media to fit the width of your blog posts. That way images you upload (if they’re not already the right size) will adjust to the width of your blog, and embedded videos will also fit your blog properly. Keeps things nice and neat!
Well, that makes 25 total! I hope these tips have been helpful for you. Did you learn anything new, or is it all old hat to you? Do you have some tips of your own to share? Leave your thoughts and comments below, I love to hear from you!
If you’ve missed the other posts in this series on DIY blog redesign, here they are:
Part 1: Discover your branding with “The Drawing Board” Printable
Part 2: WordPress vs. Blogger
Part 3: Design Tips + Design Worksheet
Part 4: Themes, Coding and Stylesheets
Part 5: Making your own graphics
Part 6: 7 Blog Layout Tips to Engage your Reader
Part 7: Blog Page: The Must-haves and the Panache
Part 8: 25 WordPress Tips (This is today’s post!)
Part 9: The Big Reveal
Part 10: 7 Ways to Promote and Market Your Blog


