A few posts back I mentioned the importance of white space (especially in your background), but that if you are worried about it making your design too boring, do not fear! There are other ways to add panache to your site – ways that enhance rather than distract from your content. The banner and the sidebar we have already discussed – and today we’ll be talking about something that I consider to be often overlooked design-wise: your menu of stand-alone pages.
When I refer to “stand-alone” pages, I’m talking about pages you create that don’t shift down in order like regular blog posts – these are pages that stand on their own. For instance, the “About Me” page is a very common example of a stand-alone page. You can see my menu of stand alone pages right below my banner – each with my own pen and ink illustration. Personally, I think that menu is one of the main things that helps my blog design to be unique and branded. Plus, it helps with navigation, as several of those pages are designed to highlight particularly useful posts (like in the Tips & Tutorial gallery or on the Printables page).
In today’s post, I’m going to be sharing my thoughts with you on important and helpful ways to use pages, as well as tips ranging from practical to the more panache on how to set them up – and, as always, demonstrating on Lori’s new site for her blog, In My Kitchen, In My Life. And I’m reeeeeeeeeeeeeally excited about Lori’s new menu of buttons which I will be showing later in this post! The possibilities are fairly endless on how you might choose to use your pages. But here are my suggestions as a couple “must-haves” in your pages … as well as a list of ideas for “maybe-haves”, depending on what kind of blog you have.

An “about” page is HUGELY important for a blog. I’ve heard statistics that, in general, the “about me” page is one of the most highly visited pages on a site. Why? Because people want to know who you are and what the site is about! People like to talk and visit with someone they know. Use your “about” page to let people get to know you. Let’s say you run a weight-loss blog. Why do you? Is it because you have a touching story of how you lost a lot of weight yourself, and you want to help others? Or is it because you see the growing trend of overweight children in America and you want to help parents keep their kids healthy? People love to hear your story.
Here are a few fun ideas for ways you might approach your “about” page:
‣ ‣ ‣ Photographs and descriptions of you doing things pertaining to your blog subject
‣ ‣ ‣ A bullet list of interesting facts about you
‣ ‣ ‣ The story of how you got involved in whatever activity it is that you blog about
‣ ‣ ‣ A video for your about page
‣ ‣ ‣ Your own personal mission statement, and the things that matter most to you
‣ ‣ ‣ Humorous interview style
‣ ‣ ‣ Stories/pictures from your childhood that help define you
‣ ‣ ‣ Separate “about” pages for your blog itself, as well as each writer on your blog
‣ ‣ ‣ Etc! Have fun with it!
Some things to probably avoid on your “about” page…
‣ ‣ ‣ Writing in the third person. Unless you have highly unusual circumstances on your blog that make it extremely formal, write in the first person. We all know it’s you writing it. Imagine you are talking to your readers when you write it … and how odd it would sound to talk in the third person.
‣ ‣ ‣ Making it reeeeeeeeeeeeeeally long. It doesn’t have to be your WHOLE life story, just give people a glimpse into your life and a taste of your personality.
‣ ‣ ‣ Résumé style. People want to “meet” you on your about page … not feel like they’re being sold to or that you’re trying to prove something. Highlighting some accomplishments is fine, but try to keep it casual and personable. Awards/features/accomplishments can, in fact, have their own page, like a “Press” page.
But one way or another, have an “About” page on your blog! You visitors are looking for it.

Your contact information should be easy to find from any page a visitor may be viewing. A good way to do this is to have your contact page in your pages menu. There are any number of reasons a visitor to your site may want to get in touch with you – they may want to advertise on your site, they may be interested in guest posting, they may spot an embarrassing typo they want to alert you to, they may want to keep in touch with you on social media sites, they may just want to say hi! Have that contact info easy to find. How much contact info you share is completely up to you. I’ve seen people on large blogs even including their home address so people can send them gifts! Personally, an email address is the most personal info I put on my site … and even that is my “professional” email address, which gets screened through a couple filters before it gets forwarded to my personal email, to weed out the spammers. Also – helpful hint here if you’re concerned about bots scanning your site – you can always include your info in an image rather than in type. That way a real visitor will be able to see it, but it won’t get scanned the same way by bots and crawlers. Or you could always set up a “contact form” where people submit their questions/messages right on your site rather than providing contact info. But at the very least, it is a good place to share your links for how to contact you on other sites – for instance, your Twitter, your blog’s Facebook page, your Pinterest, etc.

Ok, so now you have an About page and a Contact page. What other pages might you want? Really, the possibilities are endless. Here is a list of ideas – and not all of these will be applicable to everyone and you wouldn’t want this many anyway – but hopefully this list of ideas will help get your mind rolling…
‣ ‣ ‣ Home/Blog Page (helpful, because a lot of people won’t be landing on your most recent post, if they’re coming from Pinterest or anywhere else that linked to a previous post)
‣ ‣ ‣ About Blog Page (in addition to an “about me” page)
‣ ‣ ‣ Welcome Page (where you can give first time visitors a tour)
‣ ‣ ‣ Shop Page (where you sell your wares)
‣ ‣ ‣ Press Page (where you highlight places you/your blog have been featured/awarded/etc.)
‣ ‣ ‣ Sponsor Page (info on advertising/sponsoring your blog)
‣ ‣ ‣ FAQ’s Page (your answers to frequently asked questions)
‣ ‣ ‣ Highlight Content Page (pages like my “printables” page or “tips and tutorials” page that highlight especially relevant content from your blog)
‣ ‣ ‣ Outside Pages (including a button in your menu that doesn’t lead to a stand-alone page, but rather links directly to a site outside of your website – for instance my “Cafe” button in my menu takes you to my Etsy shop, FlourishCafe – or another example would be a button that takes you to a subscription form)
‣ ‣ ‣ Links Page (a page that includes links to other pages, like if you want to recommend other blogs/books/resources/etc.)
‣ ‣ ‣ Map Page (a sitemap to help people get around your blog)
‣ ‣ ‣ Etc! The sky is the limit.

First, we’ll go over the basics – and next, how to get that extra panache with images and such. Since in this series we’re moving Lori’s blog from Blogger to WordPress, most of the tech stuff in this series is about how to do things on WordPress. However, in this instance, I actually wrote a blog post a while back when I was on Blogger myself about how to make stand-alone pages in Blogger. You can click here for that post … it’s like a glimpse into the past because it’s from my old blog. 🙂
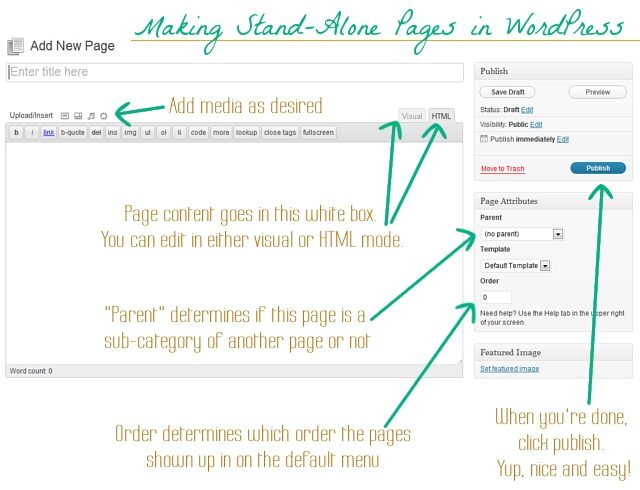
Here are the instructions for WordPress. Sign into your WordPress dashboard. On the left-hand menu, you’ll see the option “Pages”. From there, you can select “add new”. This is what you’ll see (minus my notes, of course 😉

Super easy. Now let’s take it to the next level by creating a menu of buttons for our pages!

So, now you’ve made your pages. And we discussed in an earlier post how to make your own graphics that fit your branding and design choices, and these buttons are no different. If you want to make a button for each page in the menu (such as I have under my banner) make sure each image file is exactly the same size – or at the very least, all the same height. You want your menu to look uniform and even. Go to the “Media” section of your WordPress dashboard and upload all the buttons you have made for your menu.
Next, in your WordPress dashboard, go to Appearance -> Menus. Name your new menu (I called mine “top menu”), and save it. Next, look for the “custom links” box:

In the URL box, put the link you want it to go to. If it’s leading to one of your stand-alone pages, like your about page, put the URL for that page in this box. Or, if you’re wanting to link to an outside page, such as your Etsy shop or your subscription form, just put that link here – this is how you include a button to other sites!
Then, in the “Label” box, you will want to use the following code to make it display your button image:
<div style=”background-image: url(‘http://www.inmykitcheninmylife.com/wp-content/uploads/2012/08/about.jpg‘);background-repeat: no-repeat;padding: 116px 0 0 120px;”></div>
.. only you will want to edit this code. For one thing, you will need to change the address in green to the URL of the image file you uploaded. (to get the url of an image you uploaded: go to “Media”, hover over the image, click “edit”, then scroll down to “file URL” and copy it.) Also, the numbers after “padding” will need to be adjusted to fit the size of the image you uploaded. For instance, Lori’s buttons were 120×116, your’s will be a different size, most likely. Once you’ve adjusted the code as needed, and have put it in the “Label” box, click “add to menu”. (As I’ve explained before, I’m no coding wizard … I just tweak. For a more full explanation on this particular bit of code, you can check out this blog post where I found it.)
Repeat with each button you want to make! Rearrange order by dragging and dropping. Click “save menu”. Make sure that in the box at the top of the page that your new menu is selected to make it active:

(Or, alternately, if you don’t want to use it as the main menu at the top of the page, and you want to use it else where, you can add it as a widget on your widgets page.)
Let’s say, though, that on one of the buttons, you don’t want the button itself to link to anywhere, but instead you want a drop-down menu of options to come available. Here is how you would do that…
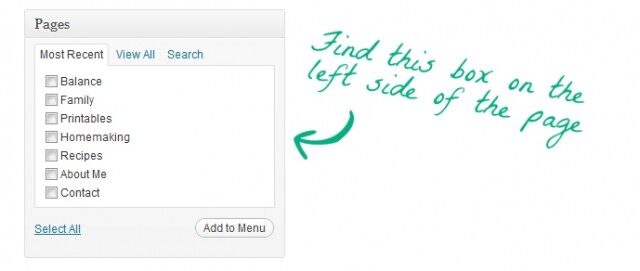
Make the button the same way, only leave the area for a URL blank. But input the image code the same way. Add to menu. So the button is ready, and doesn’t lead anywhere. Now to make the drop down menu, look for this box on the left hand side:

This is a list of all the pages you have made. Find the pages that you want to show up in the drop-down menu, select them, and click “Add to menu”. Then drag and drop those newly added pages under the button you want to be at the top – make sure you drop them so they are indented:

And now a menu will pop up with those options when someone hovers over the top button! Nifty, eh?
So *drum roll* … here is Lori’s site, now with menu buttons! She can always change them around to her own needs and desires, but for starters, here is how I’ve set it up:
She mentioned some types of pages she wanted, so she now has the following buttons:
– Blog
– About
– Recipes
– Printables
– Life Lessons (which goes into a drop down menu where she can feature any special series she chooses)
– Contact
… and, as we’ve discussed over and over again, any graphics you design for your site, like these buttons, should fit with your branding statement and design choices (style, medium, colors, etc.)
So what do you think about how things are coming along? Do you use your menu of pages as a design element? Also, I’d love to hear what pages you have set up on your own site, it would be interesting to see the variety of types of pages different bloggers have! Leave your thoughts and comments below, I love to hear from you!
If you’ve missed the other posts in this series on DIY blog redesign, here they are:
Part 1: Discover your branding with “The Drawing Board” Printable
Part 2: WordPress vs. Blogger
Part 3: Design Tips + Design Worksheet
Part 4: Themes, Coding and Stylesheets
Part 5: Making your own graphics
Part 6: 7 Blog Layout Tips to Engage your Reader
Part 7: Blog Page: The Must-haves and the Panache (This is this one!)
Part 8: 25 Tips for using WordPress
Part 9: The Big Reveal
Part 10: 7 Ways to Promote and Market Your Blog


